
View Reliability History to send bug reports to Microsoft
Writing clear defect report is an art. Every testers should provide as much information in the incident report to the developer. It should not be very short and descriptive, it should be detailed.
Following are the attributes of good defect report:
- Date
- Environment
- Build/Release/Project/Component details
- Software Versions
- DB details
- Screenshots
- Steps to reproduce with actual and expected output
- Impacted applications/systems
- Criticality
- Severity
- Detected by
- Assigned to
- Supportive documents
- URLs/Endpoint URLs
In few instances, we will get Stopped Working problems in Windows OS. Like me, many of us usually ignore that message and we just restart the program or Windows. But when I was testing Windows 10, if I find an issue, I immediately report it with the detailed report. In this blog we will see about how to View Reliability History to send bug reports to Microsoft.
Microsoft developers are there to improve their product. It is vital to send the detailed bug report to Microsoft for the fixes and enhancements.
Better software is better tomorrow
How to View Reliability History in Windows 7?
- Press Start button

- Type reliability, and hit Enter
Windows will generate the reliability history and it will display the overall stability on a scale from 1 to 10 as shown below.
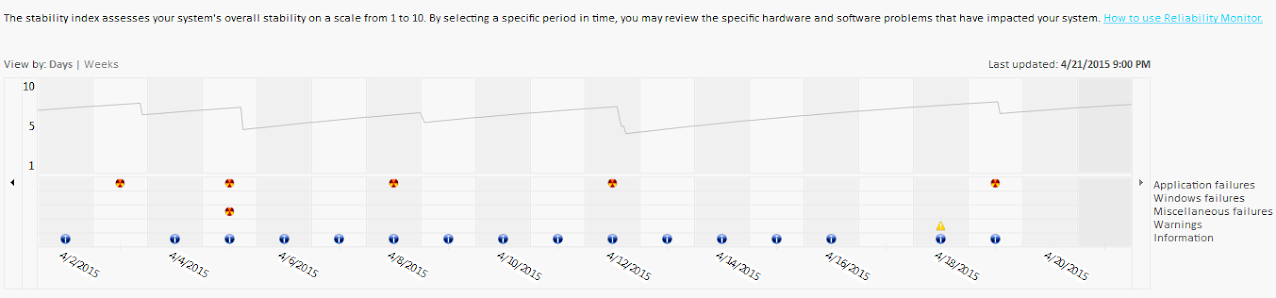
Click on the date which has the critical events. You could see the respective details just beneath the chart.

Double click on the event to view the Problem Signature. Before you send the report, I urge you to read the privacy statement http://windows.microsoft.com/en-US/windows7/windows-7-privacy-statement

Copy and paste the details for your reference, however you can find the solution online or you can click on View Solution in the same window or you can export the log to attach it in your incident report.
5d2380a0fd052b8a36ae9082d0c95918d5291ea6e55bb2e09d